# Créer et redimensionner une partition

<span style="color: rgb(0, 0, 0);">[![Scalable_gparted.svg.png](https://docs.rakouns.bzh/uploads/images/gallery/2026-02/scaled-1680-/scalable-gparted-svg.png)](https://docs.rakouns.bzh/uploads/images/gallery/2026-02/scalable-gparted-svg.png)</span>

## <span id="bkmrk-pr%C3%A9sentation-1" style="box-sizing: inherit; border: 0px; font-variant: inherit; font-stretch: inherit; line-height: inherit; font-family: inherit; font-optical-sizing: inherit; font-size-adjust: inherit; font-kerning: inherit; font-feature-settings: inherit; font-variation-settings: inherit; font-language-override: inherit; font-size: 32px; font-style: inherit; font-weight: inherit; margin: 0px; outline: 0px; padding: 0px; vertical-align: baseline; color: rgb(0, 0, 0);">Présentation</span>

<span style="color: rgb(0, 0, 0);">GParted est un utilitaire Open Source, disponible en LiveCD et en application basique, et qui permet de gérer les disques durs et les partitions de votre machine. Pour information, dans ce tutoriel, j’utilise un LiveCD de la version 0.13.1-2 de GParted.</span>

<span style="color: rgb(0, 0, 0);">Nous allons voir comment créer une nouvelle partition sur un disque dur vierge puis nous allons redimensionner cette partition, tout ça grâce à GParted.</span>

## <span id="bkmrk-boot-sur-le-live-cd--1" style="box-sizing: inherit; border: 0px; font-variant: inherit; font-stretch: inherit; line-height: inherit; font-family: inherit; font-optical-sizing: inherit; font-size-adjust: inherit; font-kerning: inherit; font-feature-settings: inherit; font-variation-settings: inherit; font-language-override: inherit; font-size: 32px; font-style: inherit; font-weight: inherit; margin: 0px; outline: 0px; padding: 0px; vertical-align: baseline; color: rgb(0, 0, 0);">Boot sur le Live CD de GParted</span>

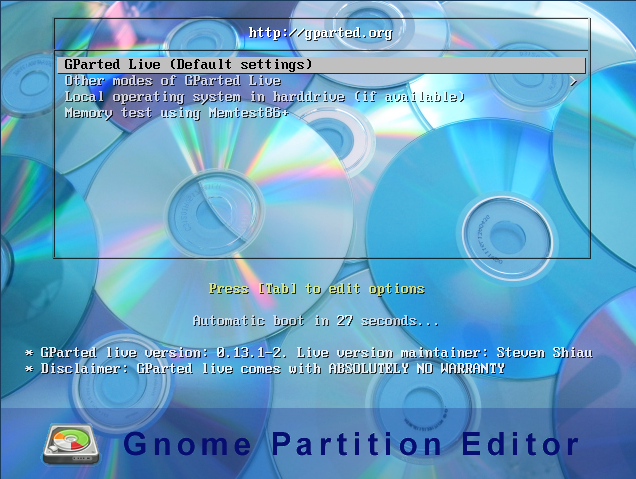
<span style="color: rgb(0, 0, 0);">Il faut booter sur le CD alors insérez-le dans votre machine puis démarrez mais n’oubliez pas de modifiez l’ordre de démarrage dans le BIOS si nécessaire.</span>

<span style="color: rgb(0, 0, 0);">![image.png](https://docs.rakouns.bzh/uploads/images/gallery/2026-02/scaled-1680-/image.png)</span>

<span id="bkmrk-choix-du-type-de-cla-1" style="box-sizing: inherit; border: 0px; font-variant: inherit; font-stretch: inherit; line-height: inherit; font-family: inherit; font-optical-sizing: inherit; font-size-adjust: inherit; font-kerning: inherit; font-feature-settings: inherit; font-variation-settings: inherit; font-language-override: inherit; font-size: 32px; font-style: inherit; font-weight: inherit; margin: 0px; outline: 0px; padding: 0px; vertical-align: baseline; color: rgb(0, 0, 0);">Choix du type de clavier</span>

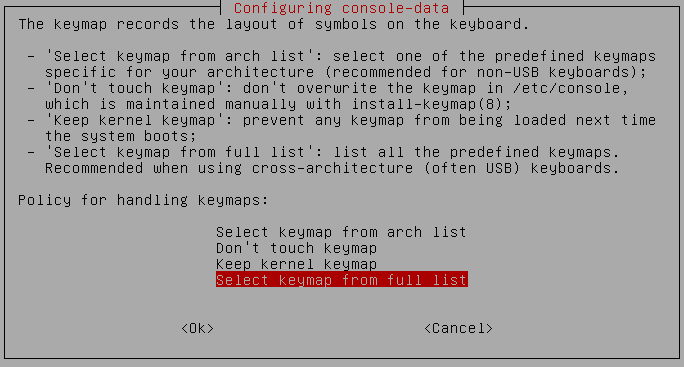
<span style="color: rgb(0, 0, 0);">Lors du chargement de l’utilitaire, l’assistant « **console-data** » se lance pour vous permettre de configurer le clavier. Dans mon cas, je mets le clavier en AZERTY, ce n’est pas que je n’aime pas le QWERTY mais bon…</span>

<span style="color: rgb(0, 0, 0);">Sélectionnez « **Select keymap from full list** » et appuyez sur « **Entrée** » après vous êtes positionné sur « **OK** ».</span>

<span style="color: rgb(0, 0, 0);">![image.png](https://docs.rakouns.bzh/uploads/images/gallery/2026-02/scaled-1680-/gaMimage.png)</span>

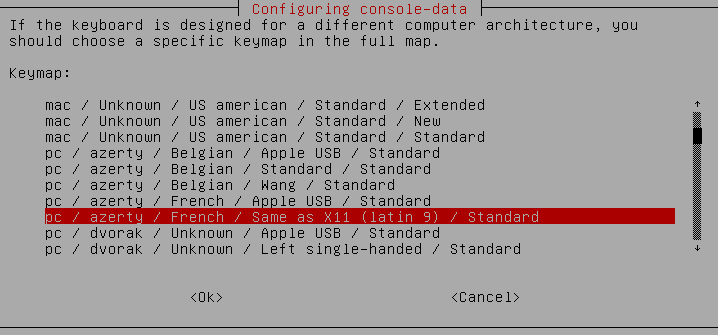
<span style="color: rgb(0, 0, 0);">Dans la liste, descendez jusqu’à tomber sur la ligne surligné en rouge dans l’image ci-dessous et continuez :</span>

<span style="color: rgb(0, 0, 0);">![image.png](https://docs.rakouns.bzh/uploads/images/gallery/2026-02/scaled-1680-/rfMimage.png)</span>

<span id="bkmrk-choix-de-la-langue-1" style="box-sizing: inherit; border: 0px; font-variant: inherit; font-stretch: inherit; line-height: inherit; font-family: inherit; font-optical-sizing: inherit; font-size-adjust: inherit; font-kerning: inherit; font-feature-settings: inherit; font-variation-settings: inherit; font-language-override: inherit; font-size: 32px; font-style: inherit; font-weight: inherit; margin: 0px; outline: 0px; padding: 0px; vertical-align: baseline; color: rgb(0, 0, 0);">Choix de la langue</span>

<span style="color: rgb(0, 0, 0);">Si vous souhaitez laisser en anglais, appuyez directement sur Entrée, sinon indiquez « **08** » et appuyez sur **Entrée** pour démarrer l’utilitaire en français.</span>

## <span id="bkmrk-choix-du-mode-de-d%C3%A9m-1" style="box-sizing: inherit; border: 0px; font-variant: inherit; font-stretch: inherit; line-height: inherit; font-family: inherit; font-optical-sizing: inherit; font-size-adjust: inherit; font-kerning: inherit; font-feature-settings: inherit; font-variation-settings: inherit; font-language-override: inherit; font-size: 32px; font-style: inherit; font-weight: inherit; margin: 0px; outline: 0px; padding: 0px; vertical-align: baseline; color: rgb(0, 0, 0);">Choix du mode de démarrage</span>

<span style="color: rgb(0, 0, 0);">Nous allons démarrer GParted avec l’interface graphique avec « **start x** » en faisant confiance à notre carte vidéo, appuyez sur « **Entrée** ».</span>

<span id="bkmrk-cr%C3%A9ation-de-la-parti-1" style="box-sizing: inherit; border: 0px; font-variant: inherit; font-stretch: inherit; line-height: inherit; font-family: inherit; font-optical-sizing: inherit; font-size-adjust: inherit; font-kerning: inherit; font-feature-settings: inherit; font-variation-settings: inherit; font-language-override: inherit; font-size: 32px; font-style: inherit; font-weight: inherit; margin: 0px; outline: 0px; padding: 0px; vertical-align: baseline; color: rgb(0, 0, 0);">Création de la partition</span>

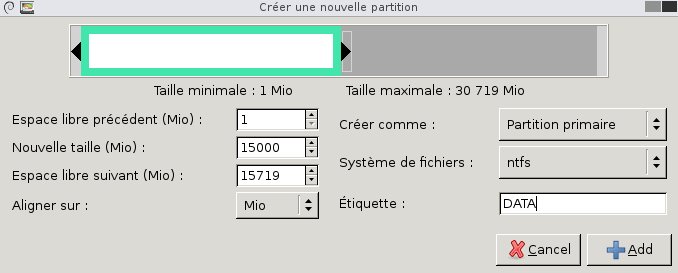
<span style="color: rgb(0, 0, 0);">GParted est désormais prêt à l’emploi. Dans l’interface, sur la droite, sélectionnez le disque dur sur lequel vous souhaitez effectuer les modifications puis cliquez sur « **Nouvelle** » pour créer une nouvelle partition. J’ai choisis – à tout hasard - de créer une partition de 15 Go.</span>

![image.png](https://docs.rakouns.bzh/uploads/images/gallery/2026-02/scaled-1680-/fPpimage.png)

<span style="color: rgb(0, 0, 0);">Remplissez le champ « **Nouvelle taille** » qui correspond à la taille de la partition (indiquez la valeur en Mo, rappel : 1000 Mo = 1 Go). Modifiez le système de fichiers et choisissez celui qui vous convient parmi le large choix proposé par GParted et donnez un nom à cette partition en remplissant le champ « **Etiquette** ».</span>

<span style="color: rgb(0, 0, 0);">Une fois que c’est terminé, cliquez sur « **Add** ».</span>

![image.png](https://docs.rakouns.bzh/uploads/images/gallery/2026-02/scaled-1680-/AY3image.png)

<span id="bkmrk-application-des-chan-1" style="box-sizing: inherit; border: 0px; font-variant: inherit; font-stretch: inherit; line-height: inherit; font-family: inherit; font-optical-sizing: inherit; font-size-adjust: inherit; font-kerning: inherit; font-feature-settings: inherit; font-variation-settings: inherit; font-language-override: inherit; font-size: 32px; font-style: inherit; font-weight: inherit; margin: 0px; outline: 0px; padding: 0px; vertical-align: baseline; color: rgb(0, 0, 0);">Application des changements</span>

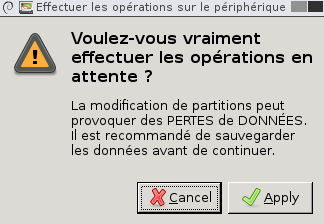
<span style="color: rgb(0, 0, 0);">Le disque dur reste inchangé tout le temps que vous ne validez pas les changements en cliquant sur « **Apply** ».</span>

![image.png](https://docs.rakouns.bzh/uploads/images/gallery/2026-02/scaled-1680-/HYeimage.png)

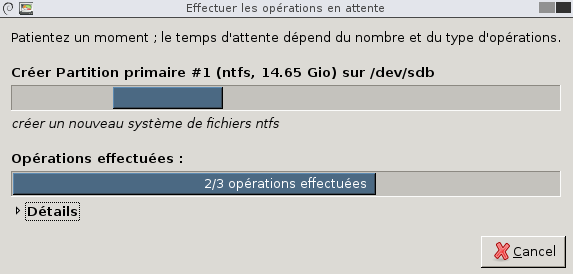
<span style="color: rgb(0, 0, 0);">Confirmez en cliquant une seconde fois sur « **Apply** » et patientez. La partition est créée uniquement à partir du moment où l’application est effectuée.</span>

![image.png](https://docs.rakouns.bzh/uploads/images/gallery/2026-02/scaled-1680-/fCVimage.png)

![image.png](https://docs.rakouns.bzh/uploads/images/gallery/2026-02/scaled-1680-/HwFimage.png)

<span id="bkmrk-redimensionnement-de-1" style="box-sizing: inherit; border: 0px; font-variant: inherit; font-stretch: inherit; line-height: inherit; font-family: inherit; font-optical-sizing: inherit; font-size-adjust: inherit; font-kerning: inherit; font-feature-settings: inherit; font-variation-settings: inherit; font-language-override: inherit; font-size: 32px; font-style: inherit; font-weight: inherit; margin: 0px; outline: 0px; padding: 0px; vertical-align: baseline; color: rgb(0, 0, 0);">Redimensionnement de la partition</span>

<span style="color: rgb(0, 0, 0);">Oups… ma partition de 15 Go me semble finalement trop limitée, nous allons donc la redimensionner pour augmenter la taille.</span>

<span style="color: rgb(0, 0, 0);">Sélectionnez votre partition en cliquant dessus sur la représentation graphique du partionnement du disque dur puis cliquez sur « **Redimensionner/Déplacer** ».</span>

![image.png](https://docs.rakouns.bzh/uploads/images/gallery/2026-02/scaled-1680-/PbLimage.png)

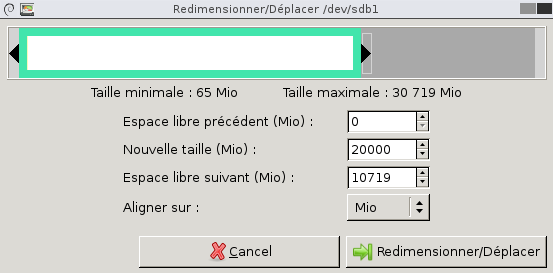
<span style="color: rgb(0, 0, 0);">Remplissez le champ « **Nouvelle taille** » pour indiquer la taille que doit faire la partition après le redimensionnement et cliquez sur « **Redimensionner/Déplacer** »</span>

![image.png](https://docs.rakouns.bzh/uploads/images/gallery/2026-02/scaled-1680-/iGaimage.png)

<span id="bkmrk-application-des-chan-3" style="box-sizing: inherit; border: 0px; font-variant: inherit; font-stretch: inherit; line-height: inherit; font-family: inherit; font-optical-sizing: inherit; font-size-adjust: inherit; font-kerning: inherit; font-feature-settings: inherit; font-variation-settings: inherit; font-language-override: inherit; font-size: 32px; font-style: inherit; font-weight: inherit; margin: 0px; outline: 0px; padding: 0px; vertical-align: baseline; color: rgb(0, 0, 0);">Application des changements</span>

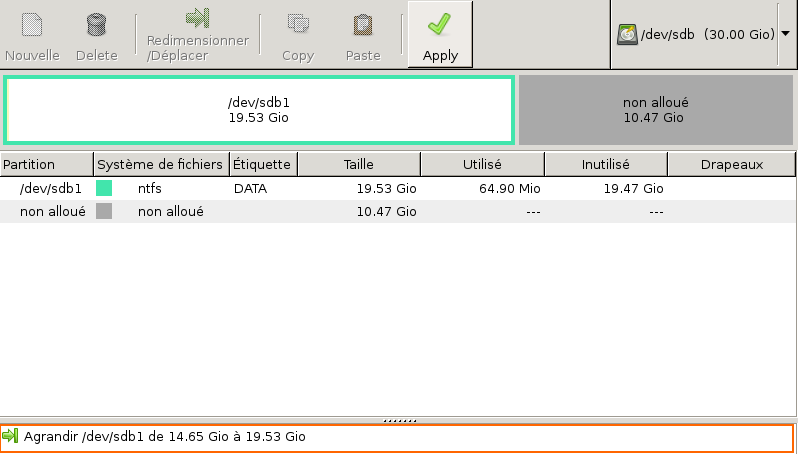
<span style="color: rgb(0, 0, 0);">Comme pour la création de la partition, vous devez valider les changements en cliquant sur « **Apply** ». Vous remarquerez que dans le bas de l’interface, on vous indique les changements que vous avez effectués.</span>

![image.png](https://docs.rakouns.bzh/uploads/images/gallery/2026-02/scaled-1680-/S7Ximage.png)

<span style="color: rgb(0, 0, 0);">Voici l’état du disque dur après le redimensionnement :</span>

![image.png](https://docs.rakouns.bzh/uploads/images/gallery/2026-02/scaled-1680-/o6Vimage.png)

<span id="bkmrk-fermeture-de-l%E2%80%99utili-1" style="box-sizing: inherit; border: 0px; font-variant: inherit; font-stretch: inherit; line-height: inherit; font-family: inherit; font-optical-sizing: inherit; font-size-adjust: inherit; font-kerning: inherit; font-feature-settings: inherit; font-variation-settings: inherit; font-language-override: inherit; font-size: 32px; font-style: inherit; font-weight: inherit; margin: 0px; outline: 0px; padding: 0px; vertical-align: baseline; color: rgb(0, 0, 0);">Fermeture de l’utilitaire</span>

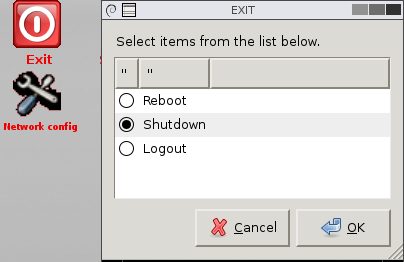
<span style="color: rgb(0, 0, 0);">Double cliquez sur « **Exit** » puis choisissez « **Shutdown** » pour éteindre la machine.</span>

[![image.png](https://docs.rakouns.bzh/uploads/images/gallery/2026-02/scaled-1680-/tyOimage.png)](https://docs.rakouns.bzh/uploads/images/gallery/2026-02/tyOimage.png)